Friday, November 21, 2008

The World's Easiest Abacus by GoSlash27


This is a device that goes hand-in-hand with the slide rule. Just as the slide rule replaces the calculator's ability to do higher operations without electronics, the addiator is capable of rapid, painless addition and subtraction without needing pen & paper.
They haven't been produced since 1982, but can still be found on eBay and in a pinch can be fabricated with simple tools.

Here's the parts:

When zeroed, the windows show all zeroes. Our cheap version has no reset mechanism, but the commercial ones are reset with a little bail handle on the top.

Basically all you have to do is enter your digits by holes from the desired number to the bottom. When an overrange condition appears in a window (shown by a red arrow), that digit is carried by a simple movement of the stylus; dragging the lowest hole to the top (thus subtracting 10), following across to the left and down (thus adding 1 to the next column).

I put together an example using JPEGs, but I found a good example of it's use in this video: YouTube

To see the original post, please visit:
www.TheOmegaMan.org/Forum

Thursday, November 20, 2008

How to Survive Falling thru Ice/Hypothermia by Griffioli

Just came across a great, quick to-do list to avoid falling through ice, how to get out if you do, and ways to avoid hypothermia. Hope you NEVER need to use it!

Some facts first:
Hypothermia sets in at 95 degrees
Unconsciousness at 86 degrees

Ice needs to be at least 4 inches (about the height of a coffee mug) to be safe to walk/skate on. Some signs of weak ice include snow on the ice (which can insulate), slush, and grey ice (caused by water, sign of melting).

So, if you do fall in, try to avoid gasping (normal physiologic response). If you can't, try to cover your nose and mouth. If water hits your throat, it will cause cold shock and muscle spasms will close your throat and make you unable to breathe. If you do gasp and can't breathe, remain calm as this will only last for up to a minute.

Orient yourself. Turn and face the direction from which you fell. If you are under water, look for the hole you fell through. The ice you walked on is the safest place of escape, as it was able to hold you for some time. Don't pull yourself straight up. Your wet clothes and weakened state will make it next to impossible to get out. Instead, use the kick, pull, roll method. Kick one or both feet to propel yourself like a dolphin out of the hole (at an angle rather than straight up) , then pull yourself out. DO NOT stand up! Instead, roll away, which disperses your body weight and makes the ice less likely to break.

Your next goal? Warm up! But do it slowly! You will still be losing heat, but you must be careful not to warm up too quickly. Beware "after drop", which is where the cold blood from your extremities circulates back to your core body. Signs of hypothermia can be confusion, uncontrolled shivering, and loss of motor control.

Do NOT rub your legs and arms. You want to concentrate on warming your torso, or "core" first. Do not get too close to the camp fire or other heat source. This causes your blood vessels to dilate and sends cold blood from extremities to your core. Find the warmest, driest place you can and get out of your wet clothes. Wet clothes trap in cold air. Dry off with whatever you can and wrap yourself in whatever dry material you can. Sip warm drinks, but not too fast. Obviously, this is all done while hopefully emergency help is on it's way.

In about an hour you'll be back to 98.6 degrees and have a hell of a story to tell your friends!

To see the original post, please visit:
www.TheOmegaMan.org/Forum

Tuesday, November 11, 2008

Blacksmithing by Thorian

Ok like the title says so you want to beat metal on a anvil?
Well let me tell ya blacksmithing is one of those hobbys that has a decent PAW life attached to it as if you are good, and that is a big if, you can make anything. (even firearms with enough time)

Some people say you need an expensive Peddinghaus (Ie Rigid) Anvil and a Brick work forge with a smoke hood and a nice big electric squirrel cage blower but I'm gonna tell you that it isn't so.

You can make your own forge for nothing but your time if you are good at scavenging parts and this little article will tell you how. Brake Drum Forge

So you need an anvil now too because if you have a forge you need something to beat your metal on. Making RR Rail Tools and Anvils

You may notice that I reference www.AnvilFire.com a lot it is because their I forge how to guides are top notch and free.

I decided that the above anvil is a lot of work for a little pay off so I bought a cheap cast steel anvil from Harbor freight. I bought the most expensive 55Lb anvil that they had and I think I paid about $60. The cheaper ones they carry are just pig iron anvil shaped objects that wont work well for long. granted the horn was rough as all hell but my grinding wheel took care of that really quick.

A suitable stump will raise the anvil top to the height of your knuckles it can be anything of suitable weight but I used a log stood on end to hold the anvil to the log I drove landscaping spikes and bent them over the feet to keep the anvil in place. And should be a minimum of the same weight as the anvil. 55lb anvil minimum 55lb stump but that is just my preference.

Now that you have a anvil and forge you need something to hit the hot steel with a hammer. Believe it or not Sears still carry's a craftsman 2lb cross peen hammer that is the ideal weight for banging steel (I paid $20 for mine at the sears in the mall) but any ball peen or drilling hammer will work ( I have a couple on my bench because sometimes they work better ) Sorry for the caps but this is the most important thing for this paragraph. DO NOT USE A CLAW HAMMER!!! IT WILL ACT LIKE A TUNING FORK THE CLAW WILL BREAK AND I HAVE SEEN ONE GET LODGED INTO SOMEONES FORE HEAD.

To hold short lengths of metal and to keep your hands from turning to charcoal a pair of tongs are a requirement they can be anything from purpose built blacksmith tongs to Pliers. Vise grips were actually invented by a blacksmith because he wanted a pair of locking quick release tongs.

Safety Equipment

Eye protection is a must you only have 2 eyes and if you burn them out with hot metal the zombies will eat you real quick.

Welding gloves I thought I didn't need gloves one time and that one time sent me to the ER with a 3rd degree burn.

Aprons a dual layer denim apron at the minimum with no pockets it will keep hot metal from getting caught in your pants and burning off your ho ha. Leather is best as it will last longer before it burns through

Steel toe shoes or boots something that if you drop a 2-8 pb sledge on wont break your toes and make sure that your pants cover the tops of your boots so that hot bits cant fall in

You will get burned some time or another the above will just limit how bad you get burned

Since you have all your equipment and are ready to start forging your masterwork ( with lots of practice ) you just need 2 things. 1 something to heat (ie steel or iron) and 2 something to burn to heat 1 ( like coal or lump charcoal.

If going the coal route Pocahontas anthracite coal is the best stuff out there but it is hard to find ( I haven't used it ) so I go to the old stand by of lump charcoal you will go through quite a bit of it and it is difficult to forge weld with ( still haven't gotten a decent weld) but it is cheap and you can find it anywhere ( I go to wally world in the spring and bring home 20 bags)

Hope this and the info from anvilfire helps ya out any other questions feel free to ask. and ill help find the answers

To see the original post, please visit:
www.TheOmegaMan.org/Forum

Saturday, October 25, 2008

Survival Gardens By Herbal Pagan

In the bad le days of the Great Depression and WW2, people got through the hard times by having a "Victory Garden". I say, we should have a "Survival Garden"! The word came out the other day that seed purchases were up this year by something like 126%. I anticipate that this will mean some shortages come spring. Go on line and bookmark the seed companies now, so that you an start as soon as the new one comes out in January. (I'll post some of my favorite links closer to that time).
Now is the time to start planning your garden. If you are an old hand at gardening, then just plan to increase it a bit if you can. If you are planning to grow a much bigger garden, now is a great time to turn over the soil in preparation for next year. If you are new to gardening, now is the time to read up on it. Libraries are full of great gardening books that you can read for free. Tr and get the ones on organic if you can, as it is much healthier.

If you don't have space for a garden, then there are several things you can do.... first, check to make sure you really don't have space. A garden should ideally have 6 hours of full sun a day, but many veggies can get by with less (if shad is your problem). You might also have space to grow somethings in with your regular landscape plants. Roses, garlic and potatoes grow quite well together, with the potatoes and garlic adding a heavy mulch around the base of the roses!
If you are an apartment dweller, or have a tiny yard with no space, then perhaps you and a couple of friends can talk to a family member, neighbor or friend who does have a bigger yard; you can barter fresh veggies, or a share of the work on their garden in exchange for the space. Another option for you might be a community garden, or if your community doesn't have one, then perhaps START one. Many companies see the value of allowing some of their land to be used in this way and many cities see it as a good use for some parts of parks and rec centers. Hospitals frequently sponsor space for a community garden and garden space for their employees. Talk to your employer about that option for you! Last, but not least, consider container gardening. One of those fancy indoor micro gardens can be bought in most department stores and you can grow a whole salad bar on your kitchen counter! If you have windows, then you can probably get something to grow for you! Remember, every little bit helps.

If you don't think you have time to garden, then consider this: with the country going into a near depression, money will be tight. Many will be losing jobs, and certainly if you have two jobs, then your chance of loosing one is greatly increased. With money so tight, gardening makes for a healthy and practical past time...in other words, you may not be able to afford some of what currently takes up your time right now. Gardening makes for a good alternative.

It is definitely more easier to garden when you have your own place! However, it IS possible to do some gardening in an apartment. A community garden, doesn't have to be on the rooftop, and you aren't trying to row everything you need, just to supplement. Growing plants in pots does require some different techniques from ground planting, but changing the dirt is not one of them! Potting up to a bigger pot, may be needed, but not changing the dirt. When planting in pots, you should use potting soil, not regular garden dirt, and use a pot big enough that you shouldn't have to repot more than once. Liquid fertilizer should take care of your nutrition needs for the growing season. There are many books on container growing that will help you find a way to do this.
It is easier to container garden when you choose specific varieties of vegetable plants, and choose containers carefully.

Good luck, and don't give up!

To see the original post, please visit:
TheOmegaMan.org/Forum

Friday, October 24, 2008

Calculating Your Target Heart Rate By BeBaker22

***READ ME - I'm not your doctor. I'm not your personal trainer. I'm not your momma. If you hurt yourself in anyway, it isn't my fault. I strongly recommend that you see a doctor before being any lifestyle change as there may be health problems you aren't aware of. Also you can't beat a personal trainer for knowledge and support when beginning a new physical fitness routine. The information I offer to you is what I have learned from working with a personal trainer and researching.

Now that I have that little piece of information out of the way.

Knowing your Target Heart Rate is essential to getting the most out of your cardio workout. How much exercise should you do? Anything is better than nothing, of course, but your best bet is to get at least 30 minutes of cardio 3 to 4 times a week. The goal of cardio is to get your heart pumping and the blood flowing. Your goal for cardio should be to get to your target rate rate. How do you find your target heart rate? Math, yep that is right, you have to think about this. The formula to figure out your target heart rate is...

First you need to figure out your resting heart rate (RHR). The best way to do this is to take your heart rate when you first wake up before you get out of bed. That isn't always convenient, I never remember to do it. Instead you can use a time when you've been inactive for a while. Mine right now is 78 bpm.

Ok so now take 220 minus your age. Then take that number and subtract your RHR. Use this number and multiply it by 0.6 and 0.8. Add your resting heart rate back into both numbers. These two numbers represent your target heart rate. So for example...

220 - 22 = 198 -78 = 120
120 * 0.6 = 72 + 78 = 150
120 * 0.8 = 96 + 78 = 174

So for the best results I should try to keep my heart rate between 150 - 174 during cardio.

This range will change as your health improves so you should reevaluate frequently.

Good luck!

More to come later...

To see the original post, please visit:
TheOmegaMan.org/Forum

Thursday, September 11, 2008

Single Cell/Pocket/KeyChain Flashlight Review by TheLastRifleMan

I am a flashlight geek. An aficionado. I freely admit it. I have at least 40 or 50 right now and will usually buy one a paycheck.
Recently, I started to categorize my lights by different criteria. So I assembled some of my single power cell/pocket/or key chain lights into one container. Hear are my top pics:


From top to bottom: Fenix E01 in blue, LED, AAA
Fenix E01 in Olive, LED, AAA
Browning MaxBlast, incandescent AAA
Sure Fire E1E, incandescent, 123 lithium
Invoa X-1, LED, AA


Five lights in one pouch! This is a military compass pouch, good for oh so many things

In order,I shall point out the features.
The Fenix lights are very small but very well made. For their tiny (7.1cm long) size, they are bright. They are rated at 10 Lumens. You have to turn the head of the light to turn it on. Being tiny, they can also be lost easily. I would recommend a lanyard to prevent this. These are my "everyday" lights and I use them daily. Price is around $15

The Browning is my latest purchase and is an awesome little light. Output is a blinding 26 Lumens, an enormous amount from such a small light. To tune on, you twist the body and head of the light, two arrows clearly showing this. While it does not have a a lanyard or a place to attach one, it does have a handy pocket clip that works well and can double as a hat brim mount. Price was $15

The Executive Elite is about the most expensive, but probably the highest quality, of the small single cell lights I own. It is also not listed in Sure Fire's catalog this year, but I am sure they can still be found. Output is 15 lumens and an LED head assembly can be purchased, although it costs nearly as much as the light. Run time is about 90 minutes with the standard bulb assembly. This is a very tough light with a push on/off or turn to on tail cap, which can also be turned to lock out the on/off. There no lanyard provision but it also has a pocket clip, but I prefer to keep it in a pouch or jacket pocket. This clip also makes a real good hat brim mount. This light has become my "going into the woods while hunting" light, since it is small and bright, but not too bright. Prices range around $65-$90 dollars.

The Inova is a really nicely made light, and sadly the dimmest of all five. It uses a single AA cell battery and has a twist on of push momentary on/off. It came with a neat little nylon holster that makes carrying it on your belt very handy. While is uses an LED, the light is focused through a lens. Range is short and there is not a lot of "spill" but it works very well in dark cars, houses and the like where range is not needed. It is also the longest of the single cell lights I own. There is a hole for a lanyard but since it came with the holster, I never used one. It also came with a Duracell battery, a very nice touch. Price was around $20.

So there you have some small lights in a nutshell. All work well and I have used each one as an everyday light at one time or another. The Surefire, being so damn expensive, rarely get used outside of my house. I am a bit paranoid about losing it but I dearly love it for hunting season. The Max Blast has yet to see a good field trial, but I am impressed with it so far. I was very impressed with the Fenix lights, although I can see a difference in brightness between the two (the olive one is a tad dimmer) although this makes little difference in the long run.

Welcome to my addiction!

To see the original post, please visit:
TheOmegaMan.org/Forum

Saturday, August 30, 2008

DIY .22/.177 Bullet Trap By: ElricFate

I was at the school I've been painting for a few months and decided I'd bug one of the electricians for a few spare parts. I grabbed a square electrical box and some electrical box covers. I brought it home and thought to myself, "What can I do with this?" ... So I grabbed some metal tape (duct sealing type with the grey goo on the other side of the metal tape, REAL STICKY STUFF!), and started putting together a .22 trap.

It was actually real simple. All I used was two large electrical box covers, three small electrical box covers, a chunk of steel girder (for reinforcing the back), metal duct sealing tape, some foam rubber pieces, regular duct tape (to cover the box after the fact), and a small piece of welding rod.

I made a crude diagram of how I put it together, and am going to include some pictures of the finished product. For targets I just cut out some cardboard pieces and stuck a few 1" targets from http://www.MyTargets.com .. I think it came out rather well. And because those electrical boxes are all steel, I know the bullets will stay IN the box. This is a fact that I've tested before, shooting the covers with a .22 from 15 yards with a subsonic load and they didn't even dent, they just made a ding sound and flattened out.

Here's the diagram, pretty crude, but it gives an explanation of why I did what I did. The support rod is two fold, 1) it keeps the walls from moving even the slightest bit, because I also reinforced all the seams where the metal meets with the electrical tape to force it into place, and 2) it keeps the electrical cover I used on the top to cover it from sliding backwards and it gave me a good mounting point for the plate, before I decided to put the piece of steel girder on the back to reinforce the back. As you can see, the back plate is at an angle to deflect the bullet downward into the foam rubber, so it's caught in the foam rubber if there's any kinetic energy left after hitting the back plate.


The parts I used are simply:


and


And the finished product:


As you can see, it only damaged the tape on the inside. There's still lots of the metal tape covering the outside, as well as duct tape reinforcing that too. The paint came off the reinforced steel, but did not dent.

Also, you can see where I concentrated about 15 of my shots into one ragged hole (not hard to do at 15 yards), and I walked a few others around the target just so you could see how solid those electrical covers really are.


LEGAL DISCLAIMER: Don't do stupid shit. If you put this together incorrectly, or hurt yourself while shooting at it, etc... It's all on you. I did this for my own satisfaction, I won't take the blame if you do some assanine.

To see the original post, please visit:
TheOmegaMan.org/Forum

Friday, August 29, 2008

Water Purification By Shiner86

I thought here we could talk about different options for purifying the water we drink in an emergency situation.

In our BOBs and EDCs, TFB and I carry Katadyn MicroPur MP 1 Water Purification Tablets.

Amazon.com - Katadyn Micropur

For home use, we've always kept unscented chlorine bleach on hand. I think I may switch over from bleach to pool shock, though. I hope it's not too late in the season to pick some up. Also, a small bag of pool shock might make a good addition to the BOBs. I've had (admittedly, off brand) water purification tabs go bad on me before. If I can figure out the dosing for pool shock when working with a small container, I might go ahead and carry some.

This government page discusses the use of chlorine bleach and calcium hydrochloride (pool shock) to treat water. I think the most important thing to remember when purchasing chlorine bleach or pool shock is that it has to be plain. No whiteners, brighteners or lemony fresh scents in the bleach. No additional algecides in the shock.
EPA

TFB also carries a small Katadyn water filter.

Amazon.com - Katadyn Hiker

Let's hear what you use! :D

To see the original post, please visit:
TheOmegaMan.org/Forum

Thursday, August 28, 2008

The Importance of Hydration

Whether you are running in the summer or for whatever reason, hiking in the winter, staying hydrated is very important. For those who have served in the military, everyone constantly nags you for keeping hydrated and during training I'm sure you can remember hydration formations.

I'm sure everyone knows that your body is made up of approximately 2/3rds of water but what makes hydrating so important is because our body needs the nutrients in it to keep functioning. When your body sweats, obviously you lose water so that your body can stay cool. The reason why hydrating when we are cold is so important is because our body does feel cool and therefore we don't drink as much water as we would when we are warm or outside working in the heat.

We are told to drink 8-10 glasses of water per day which to some people seems insane and I know that when I was first told that I thought my health teacher was insane, but it keeps our body moving and our brain going.

Now, if you are at home, work, or other such controlled environment, it's easy for you to keep track of how much water you are drinking but if you are out camping or somewhere less controlled, there is one thing you can do to make sure that your body is properly hydrated and ready to go.

Take notice the color of your urine when it comes time for you to urinate.

Clear to light yellow urine indicates proper hydration.

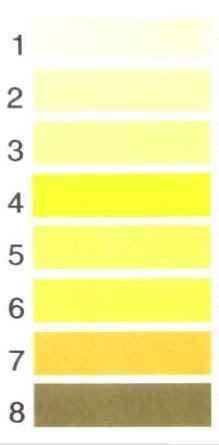
The darker the urine color, the greater the dehydration level.

Stages of Dehydration:


If your tongue looks like this:

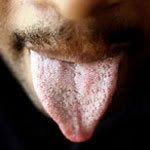
You are probably on your way to dehydration. Although you cannot see your own tongue, in a lot of cases unless you are gene Simmons, have your friend look at it for you if you aren't feeling up to par.

Signs and Symptoms

Mild to moderate dehydration is likely to cause:

* Dry, sticky mouth
* Sleepiness or tiredness — children are likely to be less active than usual
* Thirst
* Decreased urine output — fewer than six wet diapers a day for infants and eight hours or more without urination for older children and teens
* Few or no tears when crying
* Muscle weakness
* Headache
* Dizziness or lightheadedness

Severe dehydration, a medical emergency, can cause:

* Extreme thirst
* Extreme fussiness or sleepiness in infants and children; irritability and confusion in adults
* Very dry mouth, skin and mucous membranes
* Lack of sweating
* Little or no urination — any urine that is produced will be dark yellow or amber
* Sunken eyes
* Shriveled and dry skin that lacks elasticity and doesn't "bounce back" when pinched into a fold
* In infants, sunken fontanels — the soft spots on the top of a baby's head
* Low blood pressure
* Rapid heartbeat
* Fever
* In the most serious cases, delirium or unconsciousness
* Kidney Stones

Other Ways To Prevent Dehydration (As taken from here):

*Acclimate to the heat over a period of 10 -14 days by beginning to exercise during the hot parts of the day for 10 -20 minutes and gradually increase your exercise time working up to 1 – 2 hours.
*Be sure to drink plenty of proper fluids during the acclimatization period.
*Drink fluids containing sodium to keep your urine clear to light yellow
*If you sweat a lot, or heat conditions worsen, be sure to take in extra sodium during the day with your meals and/or or rehydration beverages containing sodium.
*When exercising in the heat, cloths should be breathable and allow for proper sweating and evaporation. Clothes that get wet and hold on to the sweat need to be changed regularly.
*Alter intensity and frequency if exercising in the heat. Always make adjustments as the heat and/or humidity increase.
*Hydration breaks should be more frequent and longer as the heat and/or humidity increase.

Other Sources:
WikiPedia
Games Development
Natural Medicine

To see the original post, please visit:
TheOmegaMan.org/Forum